Thursday, February 28, 2013

Full Steam Ahead

Construction of a Danenberg steam generator has been in the works.  We purchased Sandhog elements, iron fittings and pipe but decided on some minor modifications.  We built a frame using a small mover’s dolly and one, eight-foot long 2x6.


To support the 2” pipe, pipe hanger clamps were used.  Instead of using a calming chamber and glass sight tube, we are using a bucket with a toilet tank float, much cheaper than a sight glass and needle valve.  This will keep water at the proper level in the tube covering the heating element.


A gang box is used to keep pressure off the electrical connections of the heating element.  A 240-volt circuit was setup in the garage and a 12’ electrical cord connected to the box.  Filled with water and switched on for a test fire, we are making steam in about 2 minutes with lots of gurgling noises and occasional spits of water out the top tube.


The final piece will be a short piece of automotive heater hose.

Saturday, February 23, 2013

Frame Inspection

We purchased an 8’-3”x3” aluminum I-beam and a 12’-3”x1/4” aluminum flat bar to use as a temporary keel.  The I-beam establishes the flat planing surface from the transom forward.  On the 16’ Resorter, the flat planning surface is about 5’ long measured from the transom.


The flat bar establishes the curve of the keel forward of the flat planing surface.  The bar is under the I-beam and attaches to the gripe forward.


With the aluminum pieces clamped in place, any gaps at the keel landings are noted on the frames.  When cutting the new frames, this additional distance will be added to the landings during the patterning process to bring the keel landings into alignment.


The even-numbered, intermediate frames are then removed for patterning.  Where the frame lands on the bilge stringer, the factory sometimes needed to adjust the frame alignment using shims.  The thickness of any shim is noted on the frame as well and this distance is added to the pattern.


There are 3 shims of varying thickness in the boat from the factory.

Friday, February 1, 2013

Straightening Up

Twisting of the hull from rough water torques the frame joints, leveraging the screws at the topside/bottom frame "knee" joint, causing them to loosen.  And as the bottom planks swell, they expand and push the chines outward from the frame landings, taking the topside frames with them.  Notice the 4 screws of this frame station are loose, the bottom one backing out quite a bit.


The seasonal swell/shrink cycles of the bottom planks works the frames and brass screws at the knee joint back and forth, elongating the screw hole in the frame or breaking the screw.   The chines are attached to the topside frames with a ¼”-20 carriage bolt and a screw at main frames.  The chines are attached only with a screw at the intermediate frames.  Bottom swelling, pushing on the chines, will pull the screw from the wood at the intermediate frames, or break the screw, creating a gap.


When the boat was built, these intermediate frame joints were tight against the chine.  The restoration process must bring the chine and frame back into alignment.  Over time, this spreading of the bottom planks causes leaking, structural weaknesses and failure of components.  After getting the boat leveled and blocked, it is time to pull the topside frames back into position for bracing.  Using pipe clamps at the topside frame, the clamp is hooked to the bilge stringer and tightened until the intermediate frame is tight against the chine.


With the joints tight, 1”x4” pine braces are screwed to the topside frames  below the knee to hold the frames in position.  With the all joints tight, we reconfirmed the chines were still level.  With everything set, the keel and chines were removed in preparation for frame inspection and replacement.


Sunday, January 27, 2013

On The Level

With the bottom planks off, we are ready to get the boat setup and level.  Using 2 floor jacks, first the rear, then the front dollies were jacked up and the sawhorses assembled.


Crawling under the covering boards, it was tight quarters to assemble the sawhorses.


Setup on the adjustable sawhorses, we removed the bottom plank battens and the topside chine planks.  Then we began to level the chines port to starboard, first at the sawhorses and then each frame.  Using a 6’ level with equal length spacer blocks, the wedges under the support of the sawhorse where adjusted.


Next, we added supports about the perimeter to support and adjust the twist in the framework.  Cinder blocks, 2-2”x6” blocks, foam rubber and wedges are setup to lift frame stations into level.


Finally, the line projecting laser level was used to bring each frame station level port to starboard.   The wedges between the 2”x6” blocks were adjusted to raise the low side at the major frame stations until each was level.


A final check to confirm the sawhorses were still supporting the bilge stringers and all stations were level, the wedges were super glued to prevent them from moving.


Now we can begin pulling the framework back into shape.

Saturday, January 26, 2013

Bottom Removal

With the boat on the dollies, we began removing the putty from the bottom for removal of the planks.


The putty was drilled out using a modified a 5/16” wood spade bit.  The bit removes the putty to the screw top and, most of the time, the small tip would find the slot of the slotted screws.


For the few screws forward, above the waterline, the factory installed wood bungs.  We used a scribe to split the bung and pop the bung free.  With all of the screws exposed it’s time for the screw gun.  Most of the screws came out easy, except for the few broken or striped ones.


At some point, a previous owner installed 5200 rubber in the gaps between planks in an attempt to slow leaking.  This is not a good idea on original planking because with each swelling cycle the plank no longer has room to move and pushes the chines out of the frame landings and can cause the planks to cup.  The planks came off easy after cutting the 5200 in the gaps and a little prying at the striped or broken screw locations.


Several hours later, we have a lot of brass screws to recycle.

Tuesday, January 22, 2013

Bottom Inspection


With the Resorter bottoms up, we were able to take a closer look at the bottom condition.  There are several cracked planks and some hairline fractures mid-width of the plank.  In addition to the joints leaking, these cracks and fractures also allowed water in.  For 61-year-old wood, it is pretty brittle and lifeless. 


There is also a repair area on the starboard garboard plank adjacent the strut and rudder shaft.  There is an oak-backing block with steel screws from both the top and bottom.


On the opposite side, there is a hard, gray filler material over the plank, keel and a portion of the adjacent plank.


Digging out the material revealed a deep, straight, athwartships gouge in the plank, and some broken pieces on the edge.  It looks like there was a prop blade strike, maybe a broken blade?


After removing the backing block, it was determined the plank is fractured.  It is not broken completely thru but is very weak without the backing block.

Tuesday, January 1, 2013

Rolling Over

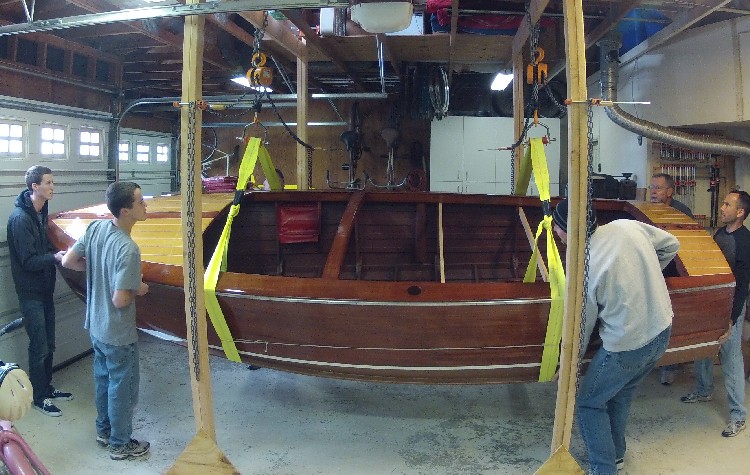
Now that we are ready to roll the Resorter over, what are we waiting for?  On Christmas Day, with family able to help, we tried turning the boat over.  Unfortunately, the lift straps wanted to walk off the rollers.


So we set the boat back onto the cradle and tried several different ideas to solve the problem, but none worked.  Finally, we decided the rollers needed the shoulder machined off, so we sent them off with my dad for modification.  Lights out for now.


On the following Sunday, with a few more bodies to help with the roll, we tried again with the adjusted rollers.


Up went the chain hoists, out went the cradle and slowly we started turning the boat. 


And still, the straps tried to walk off the rollers.  But, this time with the extra help we simply lifted the boat, re-positioned the straps and continued on.  Checking for clearance with the garage floor as we neared vertical, a little higher with the hoists was all that was needed.


Pulling the port side under, and stopping a couple of times to adjust the straps, we finally had the boat upside down.


Holding the boat to prevent it from trying to right itself, we lowered it onto some dollies with high density foam padding, and started breaking down the lift rig.


Here is a time-lapse video showing the successful flip.


Thank you to everyone who helped build the flip rig and work thru getting the Resorter on her back.  Now it is time to get the bottom planks off to start frame repairs.