Thursday, December 29, 2011

Interior

If you are following our Sea Maid blog, the November 22, 2011 post discusses the purchase of the interior kit while on a visit to Michigan. The interior kit was purchased for the Resorter as well.  The Resorter’s original interior is in fair shape, but is pretty fragile due too age.


The vinyl was sprayed a bright red, and several of the front bottom cushions are torn.  One of the rear seat bottom cushions was replaced after being lost by the previous owner and the color does not match the sprayed original pieces.


When we purchased the boat, the linoleum flooring had been removed.  New flooring was purchased but not installed.  The spray job on the interior was done nicely and everything is evenly covered.  Finding a larger area for color matching was difficult.  We were only able to find a small area on the back of the instrument panel that was protected from the sun and not sprayed.  So a small piece was cut off and sent to A&A Marine for matching.


We just got color samples for both projects and will be choosing the closest colors and grain as possible.  Soon, we will have a new interior to store while woodwork is completed.

Tuesday, December 27, 2011

Side Projects

The first blog post talks about finishing some house hold projects before starting on the major work restoring the boat.


Work on the master bath had been progressing steadily until the first week of December.  It all started on a Sunday, when the water heater sprung a leak!  I had been in the garage, no water on the floor, but 5 minutes later while retrieving a cardboard box for my wife I was splashing thru a river of warm water.


I don’t blame it, being nearly 20 years old, rusty and neglected.  I had been thinking of replacing it with a tank less water heater, but now I had to do the research and get it installed fast.  The rest of the family does not care for cold showers.


To install the tank less water heater, the cold water outlet and hot water inlet had to be relocated, gas line rerouted and resized, an electrical outlet installed and a new flue/air vent installed.  Monday after work the old water heater was removed, and drywall removed to access the water and gas lines.  Tuesday, our neighbor who works for a plumbing company, was able to order all of the necessary parts.  I worked thru the plumbing changes on paper and made a parts list, lots of copper fittings, and iron pipe and fittings.  Wednesday was spent buying the pipe and fittings.  Thursday during lunch I picked up the ordered parts and after work read the installation manuals.  Friday was spent preparing for the piping retrofit on Saturday.  Saturday the water was turned off, pipes cut, fittings sweat soldered, and outlets temporarily capped for a leak test, no leaks.  Then the gas was shut off to reroute and upsize the heater and water heater gas line, again no leaks.  A new electrical box was added.  Sunday started with the water heater isolation valves being prepared, one successful, one not.  Heating the valve the brass housing cracked.  Being a specialty valve, none were available locally, so we fabricated a temporary bypass and will replace with a new valve in the near future.  Holes were cut thru the stucco wall for the flue/air vent and condensate drain line.  Finally, the water heater was mounted on the wall, gas and water connections made, and the control panel connected.


After about 30 minutes double checking the installation and checking all settings, the unit fired up successfully!  After a week of cold water we are taking hot showers again!

Sunday, November 13, 2011

Disassembly

The past several months have been spent removing and storing the interior, hardware, and trim pieces in preparation for turning the hull over to access the bottom for repair.  The front seat frames are shown here.


Removing the fuel tank showing the vent tube and fuel gauge sender.


The engine is ready to be removed and set on a temporary cradle while the hull is repaired.


A few more things to remove and then we need to figure out how to create a lift and flip-over rig to get the boat off the trailer and upside down.

Sunday, September 11, 2011

The Good, the Bad and the Ugly

The Good
After sitting for about 10 years, the gasoline had turned to “shellac.” Once the old gas and residue was removed from the fuel system, the Graymarine 750 ran very well. Without cleaning, masking or removing rubber hoses and belt, and only removing the carburetor, a previous owner repainted the engine. It needs some cleanup and detailing.


Most of the chrome and stainless trim are in good shape, only requiring some polishing to cleanup nicely. Not show chrome.


The Bad
The original cloth covered wiring needs to be replaced. The cloth covering is very brittle, there are many cracks, and a lot of broken wire stands at connectors. We will use reproduction cloth covered wiring to replace the original wiring harness and to replace added plastic covered wiring.


The decks and covering boards are in good shape with some minor staining on the blonde decks, maybe from steel attachment screws? The live seams need to be addressed. We have not decided if the decks and covering boards will be removed and replaced now or later once the Sea Maid is restored.


The Ugly
For the lower transom bow, Century used 3 pieces of white oak glued together. With all of the screws from the transom and bottom planking, and forces from use, most have delaminated. This has allowed the lower transom plank to shift out of position along the bottom.


And finally, there is the bottom. A previous owner puttied the bottom plank gaps in an attempt to slow leaking. The start of the boating season would require a week or so to swell the bottom enough to safely leave the ramp. At the start of the next season the plank gaps would be wider due to compressive edge set, making the swelling process longer.


It’s time to start taking the Resorter apart in preparation for flipping over to repair the bottom.

Wednesday, August 24, 2011

Going Mobile

The first project prior to purchasing the Resorter was finding a suitable trailer to get it home.  A custom built trailer was too expensive, so a used trailer was needed.  After about a month of searching a 1972 Vanson trailer was located.


It was in rough shape with some rust, but it was the correct length and inexpensive.  The plan was to modify the trailer to be able to pickup the boat but it quickly became apparent the boat and trailer needed to be in the same place to make construction easier.  The Resorter on its cradle was purchased and using an auto trailer, joined the trailer at my mom and dad’s house and back yard workshop.


After studying the trailer construction chapter in Don Danenberg’s book “How To Restore Your Wooden Runabout Volume 2” we determined the location of the axle needed to be relocated, additional cross members added, propeller guard removed, and a winch tower added.  Also new electrical and paint would be required.  I did the metal fabrication, my brother did the TIG welding and my dad blasted and cleaned parts.  It was a team effort taking six weeks to complete.


Hanging by an engine hoist on the rear lifting eye and a chain hoist from the garage door header on the front lifting eye, the bunk brackets were adjusted to conform to the bottom.


Once all of the fabrication was complete, the trailer was blasted, primed and painted, and reassembled with a final few details left to complete.


A few more carpeted bunks, the bow support, and a final lift from the cradle and we are headed home.


Tuesday, August 9, 2011

A Little History

The previous owner purchased the boat from the original owner, indicating that late in life the original owner moved to California bringing the Resorter along.  Here is a picture of the boat taken by the original owner, location unknown.


Research of the boat’s history started with A&A Marine to see if they had the hull card in their archive, and they did.  Touristville Boat Company in Clear Lake, Iowa sold the boat Oct 30, 1950.


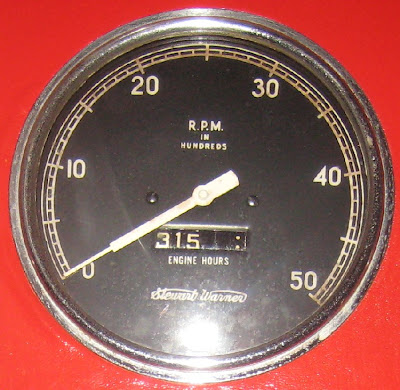
Both the hull card and identification plate under the engine box verify the Gray Marine 4-750 engine is the original.  The 5” Stewart Warner tachometer indicates 315 hours of use since new.


The hull number is deciphered as “HD” a Resorter Deluxe Utility, “51” the model year, and “55” the production sequence.  Century started the model year production sequence with “50” so this is the 6th boat built in the 1951 model year.  The Century Boat Club indicates 117 produced in 1951.

Sunday, August 7, 2011

1951 Century Resorter 16'

My wife and I purchased our 1951 Century Resorter 16' in April 2006.  The prior owner had spent a few years doing a cosmetic restoration, but the boat had not been in the water for about 10 years.


The boat was on a shipping cradle and did not have a trailer.  We spent about a month looking for a suitable trailer, purchased a used trailer and modified it to fit the Resorter.  After some final assembly, stuffing box adjustments, and swelling, our first outing on the lake was exciting.


Unfortunately, the swelling process each season was taking longer and the lower transom plank was pushing out of place, indicating a delaminated transom bow.  After 3 seasons of use and lots of research, a new bottom was in order.

Several house renovation projects later, the Resorter is just about to the top of the priority list.